Your internal camera meter is going to give you the exposure for natural grey, so if you point the meter at a dark shadow, it will make it neutral grey which will brighten your scene up. If you meter for a bright white, it will give you an exposure that will make the white a darker grey and could underexposure your photo so it is best to look for a natural grey in your scene to meter for. For very accurate metering, you can pick up an 18% grey card to meter off of, or if you’re ever buying a camera bag, we recommend buying one that is close to neutral grey which can double as a grey card! All you need to do is put it in the same light your scene is getting hit by and take the metering ready off of it and just that exposure!
Metering for Film Photography
Metering is one of the most important aspects of film photography. A properly exposed photo will yield the best results–but what is good exposure and how do you get it? It all depends on the film you’re shooting, the light you’re shooting in, and the look you want. There are many types of meters and metering techniques, like in-camera metering, spot metering, incident metering, the sunny 16 rule, and even smartphone metering apps. Since there are so many ways to get a good exposure, we’re going over some of the more common ways to meter in this post.
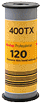
In general, you do not want to underexpose film. In fact, it’s best to err on the side of overexposure–especially when shooting with color negative film and B&W film, which both have very good exposure latitude. Underexposing your photo will result in more grain, flat tones, and a lack of shadow detail. To avoid underexposing your film, avoid metering for the highlights which are the brightest part of the image. Instead, try metering for either the mid-tones or the shadows.
Incorrect Metering. Metered for Highlights.
You might be surprised how accurate most of the smartphone light meter apps are. They work well if you don’t have an external or in-camera meter or if you want a second option to your in-camera meter. Most of the light meter apps are free and work similarly to most external meters; you just select your film iso, point your phone at the scene you’re photographing, and tap on the area you want to meter for. The app will suggest an aperture as well as shutter speed, both of which can be adjusted. If your subject is far away in a scene with contrasty light it’s best to get close to your subject to get an accurate meter reading then go back and frame your scene using that meter reading.
Some smartphone apps we recommend are; the Lumu Light meter, Pocket Light meter, and the Lux – Professional Light Meter, which are all free.
Read More about Smartphone Light Meter Apps
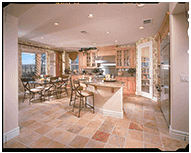
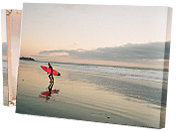
How do you meter for scenes like this?
Bright/white/reflective scenes like this can often trick a light meter because they will read brighter than what they really are which can result in an underexposed photo. That’s why both of these shots were overexposed by 1 stop while metering in-camera with a Canon Elan 7. The amazing thing is these two photos could’ve been shot 2 more stops brighter and the highlights still wouldn’t have blown out since Kodak Portra 400 has such great exposure latitude 🙌🏼.


 FAQ
FAQ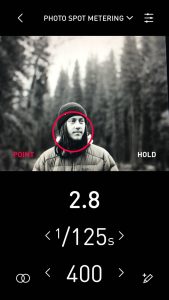
Bright/white/reflective scenes like this can often trick a light meter because they will read brighter than what they really are which can result in an underexposed photo. That’s why both of these shots were overexposed by 1 stop while metering in-camera with a Canon Elan 7. The amazing thing is these two photos could’ve been shot 2 more stops brighter and the highlights still wouldn’t have blown out since Kodak Portra 400 has such great exposure latitude 🙌🏼.