


 Gift Cards
 Film Index
 FAQ
FAQ 35mm
35mm 120/220
 Single Use Cameras
 110/126/Advantix
 Sheet Film
 Desktop Framed Prints
How to Load Any Film Camera: The Complete Guide (35mm & 120)
Loading film seems simple until you’re standing there with the back of your camera open, wondering which way the leader is supposed to go. Every camera loads a little differently, and if you’re new to film (or switching to a different style of camera), it can feel intimidating.
This guide breaks down how to load the most common types of film cameras – from point-and-shoots and SLRs to classic rangefinders and medium format systems. Whether you’re shooting 35mm or 120, this walkthrough will help you avoid wasted frames, misloads, and accidental light leaks so you can focus on making great photos.
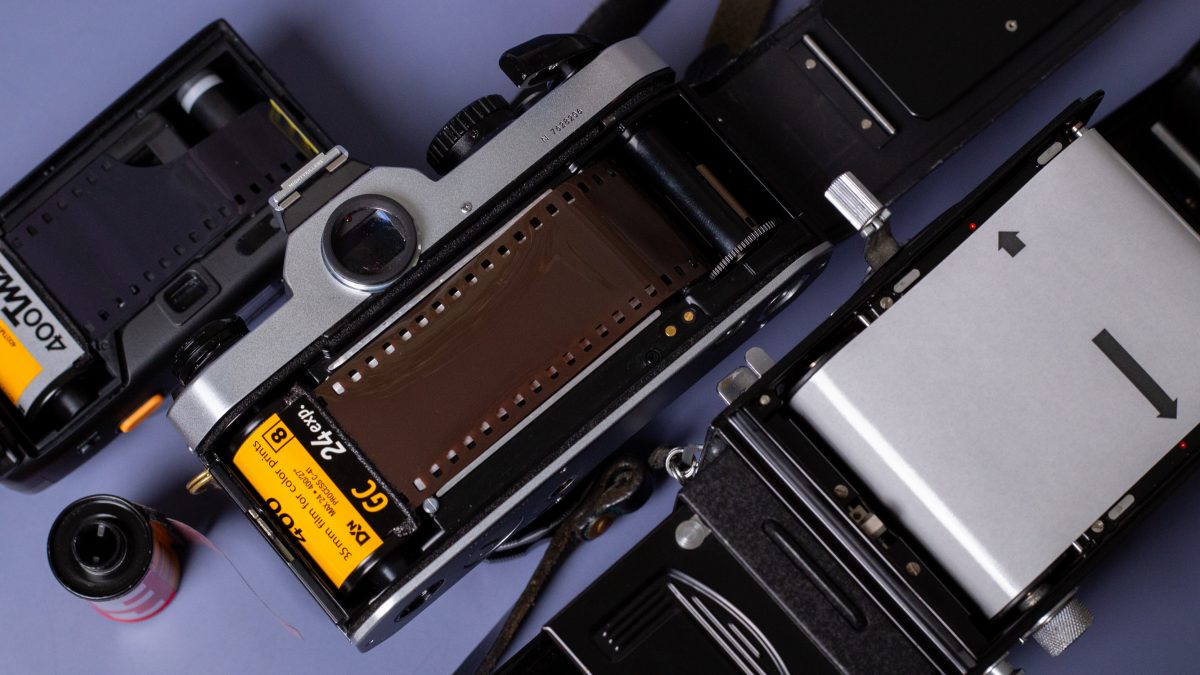
How to Load 35mm Film Cameras
35mm is the most common film format, and most cameras follow a similar basic pattern: film cartridge on one side, take-up spool on the other, leader pulled across and secured, then advance to the first frame. The details change a bit depending on whether you’re using a point-and-shoot, an auto-advance SLR, a manual SLR, or a rangefinder.
Point-and-Shoot Cameras
Point-and-shoot film cameras are usually the easiest to load. Most models work in a very similar way:
- Open the back and place the film cartridge into the film chamber.
- Pull the film leader to the marked line or graphic inside the camera (usually near the take-up spool).
- Make sure the leader lies flat along the film path.
- Close the camera back.
Once the back is closed – assuming the camera is powered on – it should automatically advance the film to frame 1.
If the LCD shows “E”, the camera still thinks it’s empty. If it shows “1”, you’re ready to shoot. After each photo, you should hear the camera automatically advance the film. When the roll is finished, most point-and-shoots will also automatically rewind the film back into the cartridge.
Electronic / Auto-Advance SLRs
Electronic SLRs with auto-advance and auto-rewind load almost exactly like point-and-shoot cameras:
- Insert the film cartridge into the film chamber.
- Pull the leader across to the take-up spool.
- Position the leader where the camera indicates (often with a small diagram or mark).
- Close the back of the camera.
If the camera is turned on, it should automatically advance to frame 1. When the roll is done, the camera will usually auto-rewind the film.
Many auto-advance SLRs also have a dedicated rewind button, which allows you to rewind the roll early if you want to switch films before finishing the current roll.
Manual 35mm SLRs
With manual SLRs, you advance and rewind the film yourself. There are two common ways to load them:
Method A: Cartridge First (Traditional Way)
- Place the film cartridge into the film chamber.
- Pull the film leader across the back of the camera.
- Insert the leader into the slit on the take-up spool.
- Gently advance the film using the advance lever to take up the slack and ensure the sprockets catch.
- Close the back of the camera and advance to the first frame.
This method works, but there’s a slightly more efficient way that many experienced shooters prefer.
Method B: Leader First (Recommended Method)
- Start by inserting the film leader into the slit on the take-up spool.
- With the leader secured, pull the cartridge across into the film chamber and seat it in place.
- Advance the film slightly to confirm it’s properly engaged on the sprockets.
- Close the back of the camera.
- Advance the film until the frame counter reaches 0 or 1.
On many manual cameras, frames before “0” will be partial or half-exposed. Some photographers love these half-frames as happy accidents.
Rewinding a Manual SLR
- After your final exposure, locate the small rewind button on the bottom of the camera and press it.
- Flip out the rewind crank (usually on the top-left side of the camera).
- Turn the rewind crank in the indicated direction. You’ll feel resistance at first.
- Keep rewinding until the tension suddenly loosens—you may hear the film slip entirely back into the cartridge.
Once the tension is gone, you can safely open the back and remove your roll.
35mm Rangefinders
Rangefinders come in several different loading styles. Some load from the bottom, some use quick-load systems, and others load just like manual SLRs.
Bottom-Loading Rangefinders (e.g., Leica
- Remove the bottom plate of the camera.
- Insert the film cartridge and pull the leader across to the take-up spool.
- Insert the leader into the take-up spool and advance slightly to make sure it’s secure.
- Reattach the bottom plate.
- Advance the film until the frame counter reaches 0 or 1, then start shooting.
To rewind, flip the rewind lever or switch, then turn the rewind knob until the tension is gone and the film is back in the cartridge.
Autofocus Rangefinders (e.g., Contax G1/G2)
Autofocus rangefinders with motorized advance load similarly to electronic SLRs:
- Insert the cartridge.
- Pull the leader to the indicated mark or take-up area.
- Close the back and let the camera auto-advance to the first frame.
Quick-Load Rangefinders (e.g., Canon Canonet QL Series)
Canon’s Quick Load system is particularly user friendly:
- Insert the film cartridge.
- Pull the leader across into the loading area.
- The built-in clamp secures the film automatically.
- Advance the film until the counter reads 1.
Older Manual Rangefinders
Many older rangefinders load very similarly to manual SLRs: cartridge on one side, take-up spool on the other, leader inserted into the spool, then advance and close the back. If you’re ever unsure, your camera’s manual or a reputable online resource for that specific model can help fill in the gaps. Pro Tip: For any manual-advance camera, gently take up the slack on the rewind knob before you start shooting. When you fire the shutter and advance the film, you should see the rewind knob move. If it moves, your film is advancing properly.
Miscellaneous 35mm cameras
- Long Weekend Cam ( Similar to; Kodak M35, RETO Pano, Walmart ONN, Ilford Sprite 35-II, Dubblefilm SHOW, TBC Transparent Camera, Target Heyday Film Camera)
- Lomography MC-A
- Pentax 17
- Rollei 35 AF
How to Load 120 / Medium Format Cameras (Overview)
Medium format (120) film cameras come in many different shapes, sizes, and designs. Unlike 35mm cameras, there is no single “standard” way to load every 120 camera. Some cameras use removable film backs, some use inserts, some require threading the film leader farther than others, and some automatically stop at the first frame while others require lining up arrows manually.
The good news is that once you understand the basics of 120 film, most cameras become much easier to load.
At its core, every 120 camera works similarly: the film comes wrapped in backing paper and is transferred from the supply spool onto an empty take-up spool as you shoot. The main differences come down to how the camera advances the film and how the loading mechanism is designed.
Some cameras are incredibly straightforward, while others take a little more practice and attention to detail.
The Different Types of 120 Cameras
There are several major categories of medium format cameras, each with slightly different loading methods:
Medium Format SLRs
These are some of the most common and popular 120 cameras. Cameras like the Pentax 67, Pentax 645, Mamiya 645, and Hasselblad 500 series all fall into this category. While they share similarities with 35mm SLRs, their film loading systems can vary quite a bit depending on removable backs, inserts, or automatic frame spacing systems.
TLR (Twin Lens Reflex) Cameras
TLRs like the Rolleiflex, Yashica Mat 124, and Minolta Autocord typically load from the bottom portion of the camera and use waist-level finders. These cameras are often very simple and reliable once you get used to the process.
Medium Format Rangefinders
Rangefinders such as the Mamiya 7 and Fujifilm GA645 tend to be lighter and more compact than SLR systems. Many are surprisingly easy to load, though each camera handles film transport differently.
Common Mistakes When Loading 120 Film
If you’re new to medium format, there are a few common mistakes worth watching out for:
- Not lining up the film start arrows correctly
- Loading the backing paper too loosely
- Forgetting to move the empty spool into the take-up position
- Advancing past the start marks
- Not fully securing removable backs or inserts
- Accidentally exposing film while changing backs
As we continue updating this guide, we’ll provide direct links to individual camera loading tutorials and videos for each model.
If there’s a specific 120 camera you’d like us to cover, let us know. There are a lot of medium format cameras out there, and we plan on continuing to expand this guide over time.